matplotlib 한글폰트 사용하기
matplotlib에서 한글깨짐에 대응하기 위해 한글폰트 사용하는 방법을 알아봅니다.
20 November 2017
matplotlib 한글폰트 사용하기
1. 필요한 패키지를 가져옵니다.
# 그래프를 노트북 안에 그리기 위해 설정
%matplotlib inline

# 필요한 패키지와 라이브러리를 가져옴
import matplotlib as mpl
import matplotlib.pyplot as plt
import matplotlib.font_manager as fm

# 그래프에서 마이너스 폰트 깨지는 문제에 대한 대처
mpl.rcParams['axes.unicode_minus'] = False
2. 그래프를 그리기 위해 임의의 데이터를 만들어 줍니다.
import numpy as np

data = np.random.randint(-100, 100, 50).cumsum()
data
array([ 85, 150, 138, 216, 216, 193, 199, 248, 197, 144,  95, 188, 199,
       164, 106, 153, 154, 188, 156, 200, 294, 323, 245, 321, 298, 299,
       346, 323, 223, 304, 318, 236, 233, 291, 335, 378, 361, 401, 412,
       360, 344, 326, 391, 356, 363, 309, 328, 283, 285, 341])
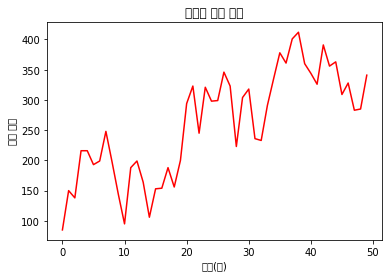
3. 기본 폰트로 지정 되었기 때문에 한글이 깨져 나옵니다.
plt.plot(range(50), data, 'r')
mpl.rcParams['axes.unicode_minus'] = False
plt.title('시간별 가격 추이')
plt.ylabel('주식 가격')
plt.xlabel('시간(분)')
Text(0.5,0,'시간(분)')

4. 폰트를 설정해 주기에 앞서 설치 된 matplotlib 의 버전과 위치정보를 가져옵니다.
print ('버전: ', mpl.__version__)
print ('설치 위치: ', mpl.__file__)
print ('설정 위치: ', mpl.get_configdir())
print ('캐시 위치: ', mpl.get_cachedir())
버전:  2.1.0
설치 위치:  /Users/corazzon/codes/jupyter/lib/python3.6/site-packages/matplotlib/__init__.py
설정 위치:  /Users/corazzon/.matplotlib
캐시 위치:  /Users/corazzon/.matplotlib
5. matplotlib의 위치정보를 알았으니 터미널을 이용해 해당 위치로 가봅니다.
print ('설정파일 위치: ', mpl.matplotlib_fname())
설정파일 위치: /Users/corazzon/codes/jupyter/lib/python3.6/site-packages/matplotlib/mpl-data/matplotlibrc
6. 설치 된 폰트를 찍어 봅니다.
font_list = fm.findSystemFonts(fontpaths=None, fontext='ttf')

# ttf 폰트 전체갯수
print(len(font_list))
197
# OSX 의 설치 된 폰트를 가져오는 함수
font_list_mac = fm.OSXInstalledFonts()
print(len(font_list_mac))
197
# 시스템 폰트에서 읽어온 리스트에서 상위 10개만 출력
font_list[:10]
['/Library/Fonts/Gurmukhi.ttf',
 '/System/Library/Fonts/SFCompactText-SemiboldItalic.otf',
 '/System/Library/Fonts/SFCompactDisplay-Medium.otf',
 '/Library/Fonts/NanumMyeongjo.otf',
 '/Library/Fonts/NanumSquareRoundOTFL.otf',
 '/System/Library/Fonts/SFCompactDisplay-Semibold.otf',
 '/Library/Fonts/Arial Narrow Bold Italic.ttf',
 '/Library/Fonts/STIXNonUniBol.otf',
 '/Library/Fonts/STIXIntUpSmReg.otf',
 '/System/Library/Fonts/ZapfDingbats.ttf']
f = [f.name for f in fm.fontManager.ttflist]
print(len(font_list))
# 10개의 폰트명 만 출력
f[:10]
197


['DejaVu Sans',
 'DejaVu Sans',
 'DejaVu Serif',
 'STIXSizeFiveSym',
 'STIXSizeFourSym',
 'STIXSizeTwoSym',
 'STIXSizeFourSym',
 'DejaVu Sans Mono',
 'DejaVu Serif Display',
 'STIXGeneral']
# [f.name for f in fm.fontManager.ttflist if '' in f.name]
7. 나눔고딕을 사용할 예정이기 때문에 이름에 ‘Nanum’이 들어간 폰트만 가져와 봅니다.
- 폰트를 설치했는데 원하는 폰트명을 가져오지 못 할때, 터미널을 열어 mpl.get_cachedir()로 찍히는 캐시위치로 이동해서 캐시파일을 열어봅니다.
- 캐시파일에 원하는 폰트리스트가 없으면 주피터 노트북 혹은 콘다를 재실행 해줍니다.
[(f.name, f.fname) for f in fm.fontManager.ttflist if 'Nanum' in f.name]
[('NanumGothicOTF', '/Library/Fonts/NanumGothic.otf'),
 ('NanumBarunGothicOTF', '/Library/Fonts/NanumBarunGothicUltraLight.otf'),
 ('NanumSquareRoundOTF', '/Library/Fonts/NanumSquareRoundOTFEB.otf'),
 ('NanumBarunGothicOTF', '/Library/Fonts/NanumBarunGothicLight.otf'),
 ('NanumBarunpen', '/Library/Fonts/NanumBarunpenBold.otf'),
 ('NanumBarunGothic', '/Library/Fonts/NanumBarunGothicLight.ttf'),
 ('Nanum Brush Script OTF', '/Library/Fonts/NanumBrush.otf'),
 ('NanumSquareRoundOTF', '/Library/Fonts/NanumSquareRoundOTFR.otf'),
 ('NanumMyeongjoOTF', '/Library/Fonts/NanumMyeongjoBold.otf'),
 ('Nanum Pen Script OTF', '/Library/Fonts/NanumPen.otf'),
 ('NanumBarunpen', '/Library/Fonts/NanumBarunpenRegular.otf'),
 ('NanumSquareOTF', '/Library/Fonts/NanumSquareOTFExtraBold.otf'),
 ('NanumBarunGothicOTF', '/Library/Fonts/NanumBarunGothic.otf'),
 ('NanumGothicOTF', '/Library/Fonts/NanumGothicLight.otf'),
 ('NanumBarunGothicOTF', '/Library/Fonts/NanumBarunGothicBold.otf'),
 ('NanumGothicOTF', '/Library/Fonts/NanumGothicExtraBold.otf'),
 ('NanumMyeongjoOTF', '/Library/Fonts/NanumMyeongjo.otf'),
 ('NanumSquareRoundOTF', '/Library/Fonts/NanumSquareRoundOTFB.otf'),
 ('NanumSquareOTF', '/Library/Fonts/NanumSquareOTFBold.otf'),
 ('NanumSquareOTF', '/Library/Fonts/NanumSquareOTFLight.otf'),
 ('NanumMyeongjoOTF', '/Library/Fonts/NanumMyeongjoExtraBold.otf'),
 ('NanumSquareRoundOTF', '/Library/Fonts/NanumSquareRoundOTFL.otf'),
 ('NanumGothicOTF', '/Library/Fonts/NanumGothicBold.otf'),
 ('NanumSquareOTF', '/Library/Fonts/NanumSquareOTFRegular.otf'),
 ('NanumBarunGothic', '/Library/Fonts/NanumBarunGothicUltraLight.ttf'),
 ('NanumBarunGothic', '/Library/Fonts/NanumBarunGothicBold.ttf'),
 ('NanumBarunGothic', '/Library/Fonts/NanumBarunGothic.ttf')]
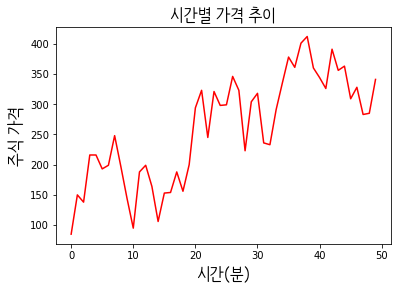
9. 폰트를 사용하는 방법은 3가지가 있습니다.
1) FontProperties 를 사용하는 방법 - 그래프의 폰트가 필요한 항목마다 지정해 주어야 합니다.
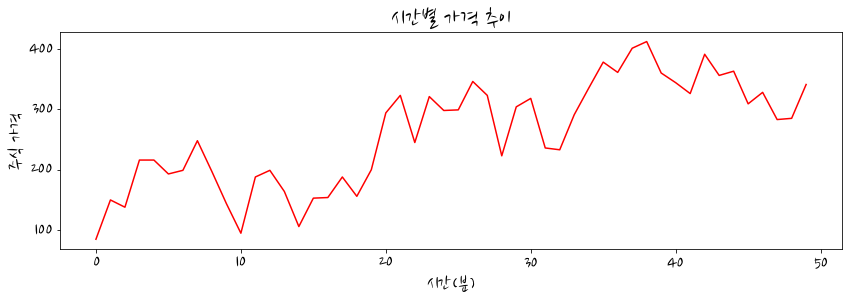
2) matplotlib.rcParams[]으로 전역글꼴 설정 방법 - 그래프에 설정을 해주면 폰트가 필요한 항목에 적용 됩니다.
3) 2)번의 방법을 mpl.matplotlib_fname()로 읽어지는 설정 파일에 직접 적어주는 방법, 단 모든 노트북에 적용됩니다. 노트북을 열 때마다 지정해 주지 않아도 돼서 편리합니다.
1) FontProperties 를 사용하는 방법
- 텍스트를 지정하는 항목에 지정해 사용할 수 있습니다. 지정해 준 항목에만 해당 폰트가 적용 됩니다.
- matplotlib.pyplot
- title()
- xlabel()
- ylabel()
- legend()
- text()
- matplotlib.axes
- set_title()
# fname 옵션을 사용하는 방법
path = '/Library/Fonts/NanumBarunpenRegular.otf'
fontprop = fm.FontProperties(fname=path, size=18)

plt.plot(range(50), data, 'r')
plt.title('시간별 가격 추이', fontproperties=fontprop)
plt.ylabel('주식 가격', fontproperties=fontprop)
plt.xlabel('시간(분)', fontproperties=fontprop)
plt.show()

2) matplotlib.rcParams[]으로 전역글꼴 설정 방법
# 기본 설정 읽기
import matplotlib.pyplot as plt

# size, family
print('# 설정 되어있는 폰트 사이즈')
print (plt.rcParams['font.size'] )
print('# 설정 되어있는 폰트 글꼴')
print (plt.rcParams['font.family'] )
# 설정 되어있는 폰트 사이즈
10.0
# 설정 되어있는 폰트 글꼴
['sans-serif']
# serif, sans-serif, monospace
print('serif 세리프가 있는 폰트--------')
print (plt.rcParams['font.serif'])
print('sans-serif 세리프가 없는 폰트 --------')
print (plt.rcParams['font.sans-serif'])
print('monospace 고정폭 글꼴--------')
print (plt.rcParams['font.monospace'])
serif 세리프가 있는 폰트--------
['DejaVu Serif', 'Bitstream Vera Serif', 'Computer Modern Roman', 'New Century Schoolbook', 'Century Schoolbook L', 'Utopia', 'ITC Bookman', 'Bookman', 'Nimbus Roman No9 L', 'Times New Roman', 'Times', 'Palatino', 'Charter', 'serif']
sans-serif 세리프가 없는 폰트 --------
['DejaVu Sans', 'Bitstream Vera Sans', 'Computer Modern Sans Serif', 'Lucida Grande', 'Verdana', 'Geneva', 'Lucid', 'Arial', 'Helvetica', 'Avant Garde', 'sans-serif']
monospace 고정폭 글꼴--------
['DejaVu Sans Mono', 'Bitstream Vera Sans Mono', 'Computer Modern Typewriter', 'Andale Mono', 'Nimbus Mono L', 'Courier New', 'Courier', 'Fixed', 'Terminal', 'monospace']
plt.rcParams["font.family"] = 'Nanum Brush Script OTF'
plt.rcParams["font.size"] = 20
plt.rcParams["figure.figsize"] = (14,4)
plt.plot(range(50), data, 'r')
plt.title('시간별 가격 추이')
plt.ylabel('주식 가격')
plt.xlabel('시간(분)')
plt.style.use('seaborn-pastel')
plt.show()

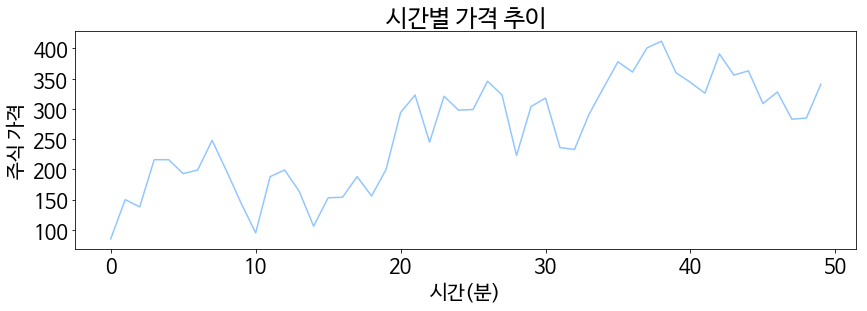
rcParams 대신 FontProperties 와 plt.rc 를 사용하는 방법
path = '/Library/Fonts/NanumBarunGothic.ttf'
font_name = fm.FontProperties(fname=path, size=50).get_name()
print(font_name)
plt.rc('font', family=font_name)

fig, ax = plt.subplots()
ax.plot(data)
ax.set_title('시간별 가격 추이')
plt.ylabel('주식 가격')
plt.xlabel('시간(분)')
plt.style.use('ggplot')
plt.show()
NanumBarunGothic

3) rcParams 를 설정파일에 직접 적어주는 방법 - 모든 노트북에 공통적용
- font.family : NanumGothicOTF
- 이 외에 자주 사용하는 설정도 함께 해주면 편리합니다.
- 이곳에 폰트를 지정해 주면 노트북을 실행할 때 바로 로드되도록 설정할 수 있습니다.
print ('설정파일 위치: ', mpl.matplotlib_fname())
설정파일 위치: /Users/corazzon/codes/jupyter/lib/python3.6/site-packages/matplotlib/mpl-data/matplotlibrc
# import matplotlib.pyplot as plt
# import numpy as np

fig, ax = plt.subplots()
ax.plot(10*np.random.randn(100), 10*np.random.randn(100), 'o')
ax.set_title('숫자 분포도 보기')
plt.show()

참고 URL :
- font_manager — Matplotlib 2.1.0 documentation
- Customizing matplotlib — Matplotlib 2.0.2 documentation
- 마이너스 폰트가 깨지는 문제 unicode_minus.py — Matplotlib 2.0.2 documentation
- https://financedata.github.io/posts/matplotlib-hangul-for-osx.html